Thursday 31 January 2013
Conceptual Portraiture: Evalutation
When we were given a fashion project I was dreading it because I'm not really into fashion but after seeing lots of fashion photographs different styles I was feeling a bit better about the project. It was really fun learning about old fashioned camera's and I wanted to use them for my final project. I was inspired by Horst P Horst because of his feminine photographs.
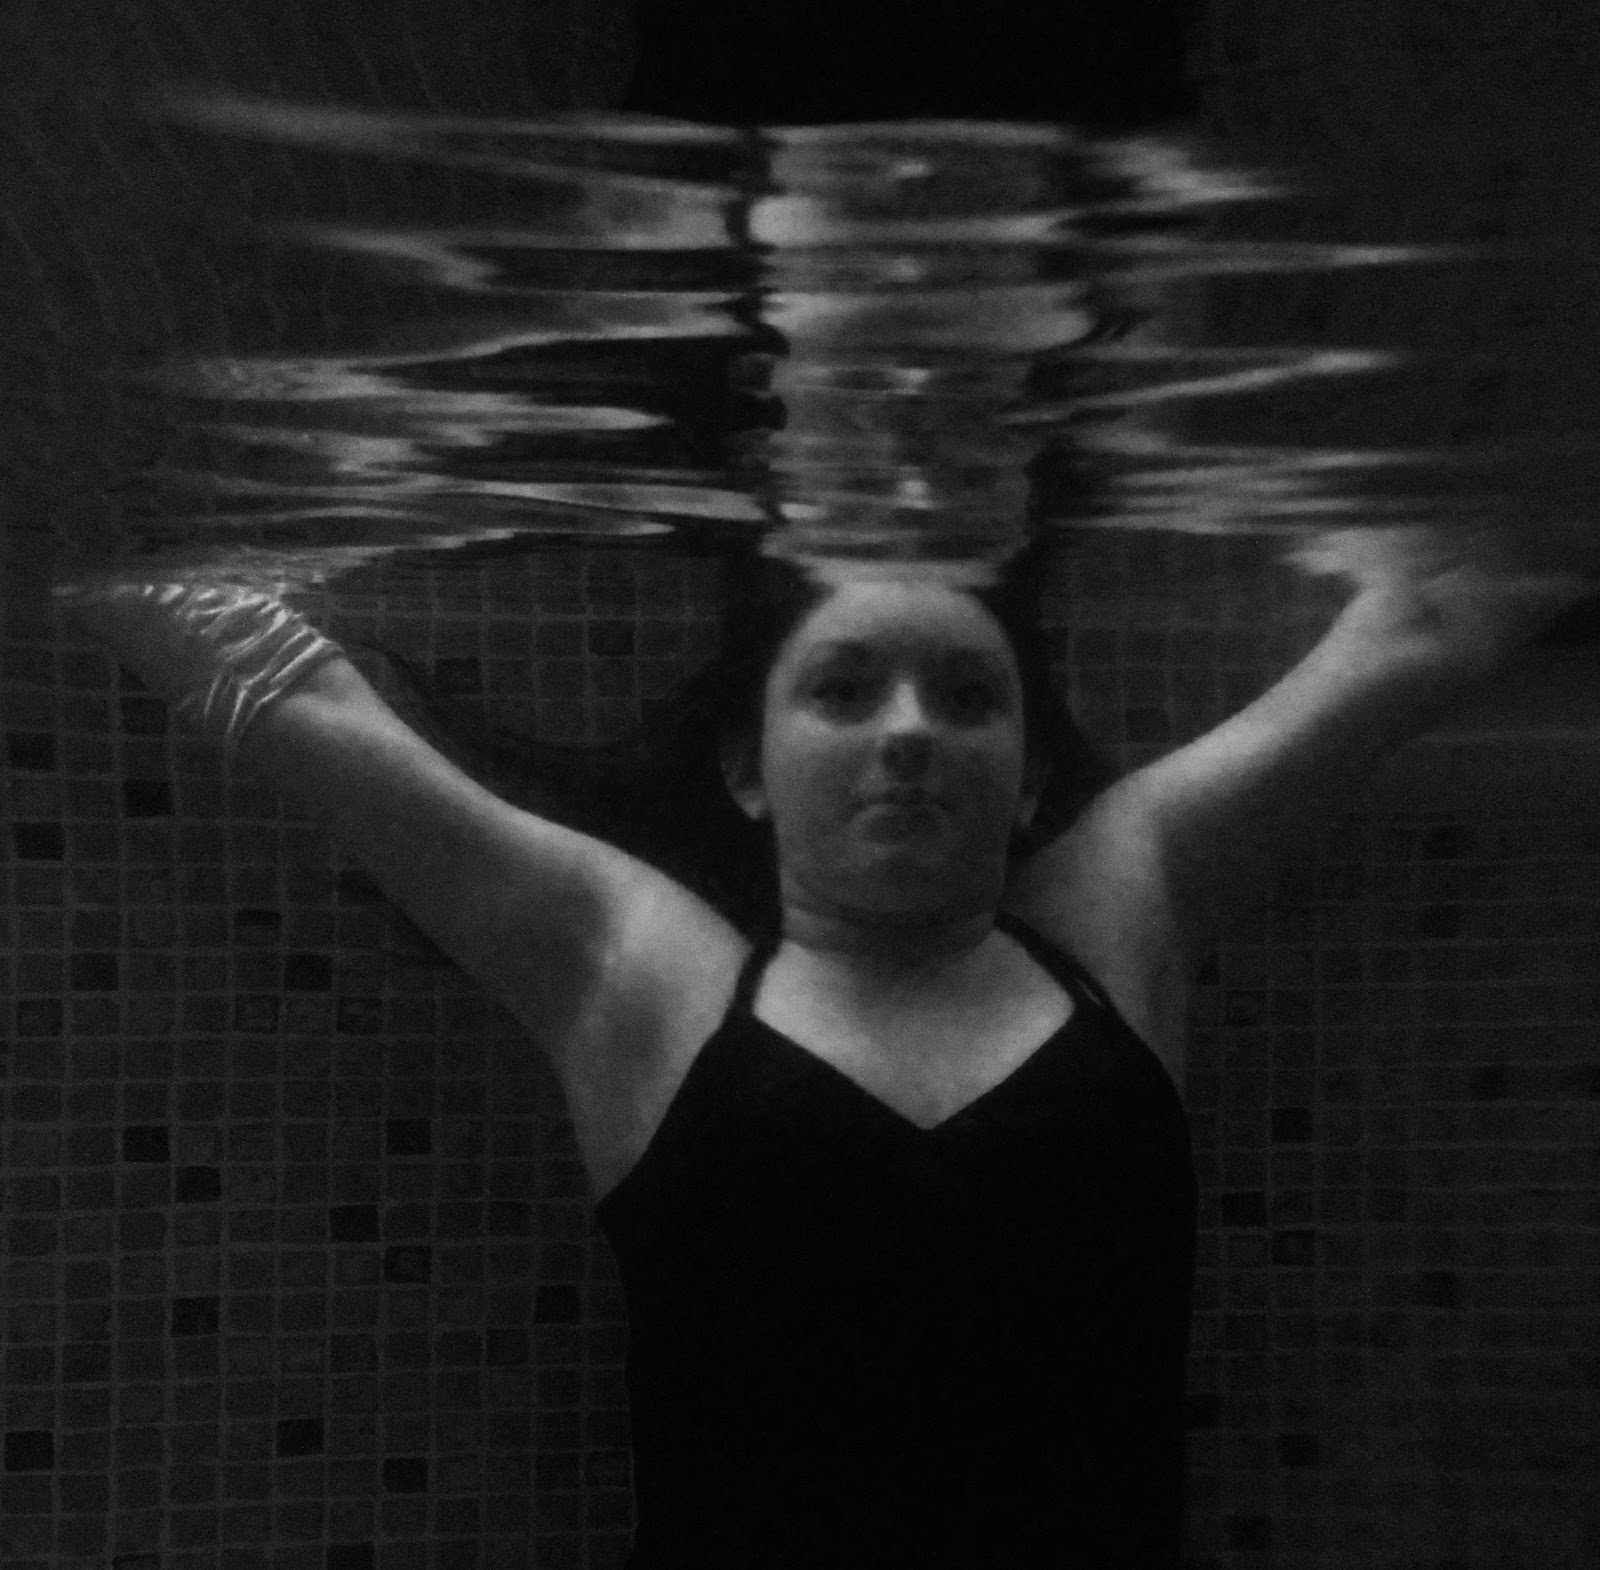
My first idea was to do some underwater fashion photography and I decided to stick with it because it'd be good for experience and I wanted to do something which wasn't normal and break boundaries but this meant I wouldn't have been able to use a medium format or large format camera.
The difficult part of doing underwater photography was finding a place which would let me take pictures. But my dad's friend was a scuba diver and he was able to let me photograph in a swimming pool. But I was disappointed in myself that I messed up my photographs by them being out of focus and grainy. After showing my images in a class critique my images being out of focus and grainy matched olden day photography as it wasn't perfected which made me feel a bit better about my images but still terrible that I would fail the project. I decided I wanted to try again but this time at least get my images in focus. That would have to be the final time to perfect it because of the project ending soon and then the issue of doing the shoot on a weekend was better for my model and me.
My second shoot was brilliant as my images came out as I wanted them to so that was a big relief for me. The surface of the water played a bit part in my photographs as they helped capture contrast and portray the element of water. I was finally happy that I had accomplished what I imagined when we were told we had a fashion project.
I was very pleased with my outcome for this project because I was pleased that I managed to shoot underwater but also because I think I managed to capture the Horst P Horst femininity of my models.
Zines: Evaluation
For my printed zine the reason I chose to base it on Italy was because I had just got back from holiday and thought my photographs were of a good quality.
When I came back from holiday I put all my pictures on a memory stick and organized them into folders of the events that happened so when I came to choosing which photographs I wanted to include it was reasonably easy as I wanted some from each event. From each event I chose around 6 or 7 photographs.
At first I wanted to produce a magazine like a holiday brochure, my teacher said like a diary and then I decided it would be a diary. When I think of a diary I imagine a normal lined paper diary without pictures so mine would have to be better than a normal diary because my pictures were the main thing.
As time went on making my diary/ journal I decided the writing to go with my pictures would be factual stories about my village so it's not only documenting my summer it's informing people of the traditions in Italy and my village.
Putting my pictures into the polaroid template took a long time because I wanted to include the time and the dates of when the picture was taken even though polaroid's don't have any writing on them. I decided to make them different and this was the way.
When I had to put them into Indesign it was easy to use the program considering I'd never even heard of it until September.
The difficult part was getting the pages into the right order for printing, otherwise the project was fun and I think my magazine got across my idea.
For my video zine I wanted to stay connected with my magazine of Italy. My first idea was to show my pictures and read my stories out loud. But as there had to be interviews with people I then decided to interview my family members about Italy. I didn't know what to ask them until I realised that my mum and my grandma had lived in Italy and then moved to England.
When I was taking my video's on my camera after ten minutes the camera stopped recording as my grandma's interview was longer compared to my mother's and sister's. I decided to interview my sister because even though we lived there when we were younger and we moved to England she decided to move back to Italy.
When it came to editing my video's I found the technical side easy as I had used premiere pro before but there was some technical difficulties with my video file type as some of them wouldn't open in premiere. I had to go to the technician to see if they could be saved and they could. I noticed that after they had been recovered there was a popping clicking noise embedded in the video. As my interviews came up to 6 minutes I had a lot of filling shots to take. I started off with pictures but as they were still they didn't really fit in with my video so instead I wanted to show her life through photographs. I looked through old photo albums and couldn't find many of my grandma when she was a teenager or when she moved to England so I found photographs of when she got married and when her grandchildren were little so I included them.
When my video was finished I thought it wasn't bad but I would have liked to made it more better with animation.
Zines: Task 4 & 5
Prepare photographs and other source material for digitising and digitise source material
For my print zine I inserted my photographs into polaroid format

Before:


For my video zine I took my videos on my pentax camera. When I went to go put them into premiere pro some files worked but some files wouldn't work as premiere informed me they were damaged. I had to go see the technician and he told me they wouldn't work as they were AVI files. We had to export them to MP4 files in order for them to work in premiere.


Monday 28 January 2013


Conceptual Portraiture: Shoot 2
After my first shoot I wasn't pleased with the underwater camera bag I decided to purchase another underwater camera bag as the first bag the camera was in a landscape position inside the bag but I was looking for a bag that would let my camera sit upright. The difference was the bag itself. So I found myself another bag which was perfect because it was all clear and the lens length was 8.5 cm instead of 19 cm.


Practice shots:
I decided to test my new camera bag again and with the same doll but I decided to change her dress and in the bathtub. This time instead of using freezing cold water I had more hot water than cold. This was because the pool for my second shoot the water was 32-35 degrees warm and the camera bag could only work up to 35 degrees.
This bag was so much easier to use with pressing buttons and zooming in and out.
I took more images for this test than last time.


When I was taking these photographs I had them on auto focus and my settings were shutter speed 1/60th and F10 with my ISO at 400. Some of the photographs are out of focus but more of them are in focus. When I was taking the photographs I didn't realise I had so many reflections with the surface of the water.
I decided to edit a few of them again in black and white.

I decided to try cropping this as a square format picture.


I also added some contrast to make the dark areas pop a bit more.

Before & After:


I carried out the same steps for all the photographs


Before & After:


Third picture:


Before & After:


Shoot 2:
I was meant to get in the pool at half 2 until half 4 but there was a lesson until 3 so I had two hours to take my photographs. Due to problems I ended up with only one model.


Editing images:
First I turned my images into black and white using the black and white option in Image > Adjustments > Black and White.
I found that the red and yellow channels were for the skin tones.

I then used curves to make the image a bit darker


I then cropped the image to a square format

As there was two objects in the photograph that were distracting I decided to use the patch tool to edit them out

2nd image:


I decided to go back a few steps and recrop the image as there was another object in the way and I couldn't edit it out.

Even though I had edited them image before with contrast I had to redo it as I deleted that step to crop the image. I wanted to make the image more black as it felt more on the grey side.


4th image:


I decided to add a mask layer so that I could keep the dress black and the background the same.


6th image:


7th image:
When I put my raw images into Photoshop I wasn't editing them, so I starting editing them by increasing the blackness


8th image:


11th image:


13th image:


14th image:


Subscribe to:
Posts (Atom)